 Save
Save My niece called me three weeks before her graduation, voice cracking with a mix of excitement and panic, asking if I could bring something special to her party. When she said cupcakes with little graduation caps on top, I realized she wasn't just asking for dessert—she wanted something that said we were proud of her. That's when these festive toppers became my mission, and honestly, watching her face light up when she saw them made every sticky candy assembly worthwhile.
I made a test batch on a random Tuesday afternoon, and my partner kept stealing them straight off the cooling rack, which meant I had to bake a second batch just to have enough to decorate. By the time the real party rolled around, I'd figured out all the little tricks—like how the chocolate sets faster than you'd expect and why spacing the tassels matters more than you'd think.
Ingredients
- All-purpose flour: Use the standard kind you probably already have; it gives these cupcakes a tender crumb without any fuss.
- Granulated sugar: This is what makes the batter light and fluffy, so don't skip the creaming step.
- Unsalted butter: Softened butter creams better, and using unsalted lets you control the salt level.
- Large eggs: They need to be room temperature so they blend smoothly into the mixture.
- Whole milk: This keeps the cupcakes moist and tender without being dense.
- Baking powder: Make sure yours is fresh; old baking powder is the silent killer of fluffy cupcakes.
- Salt: Just a pinch, but it brings out all the vanilla flavor and balances the sweetness.
- Pure vanilla extract: Never the imitation stuff if you can help it; the flavor difference is real.
- Powdered sugar: Sift it before using so your frosting stays smooth and lump-free.
- Mini peanut butter cups: They form the dome of the cap, but go with chocolate squares if allergies are a concern.
- Chocolate square candies: These are the base of your cap, so pick ones that taste good because people will notice.
- String licorice or sour candy strips: These become the tassels and add that unmistakable graduation cap look.
- Mini M&Ms or candy pearls: A single piece on top looks like a graduation cap button and adds the perfect finishing touch.
Tired of Takeout? 🥡
Get 10 meals you can make faster than delivery arrives. Seriously.
One email. No spam. Unsubscribe anytime.
Instructions
- Get your oven ready and prep your pan:
- Heat your oven to 350°F and line a muffin tin with paper liners so you don't have to wrestle with sticky cupcakes later. This step takes two minutes but saves so much frustration.
- Cream butter and sugar until it's light and fluffy:
- Use an electric mixer and beat them together for about two minutes—you'll see the mixture go from pale yellow to almost white and fluffy. This is where the air gets incorporated, and it matters.
- Add eggs and vanilla one at a time:
- Beat in each egg fully before adding the next one, then add vanilla and mix until smooth. If you rush this, you'll end up with a grainy batter.
- Mix your dry ingredients in a separate bowl:
- Whisk together flour, baking powder, and salt so the baking powder distributes evenly. This prevents lumps in your finished cupcakes.
- Combine wet and dry ingredients carefully:
- Add half the dry mixture to the butter mixture, mix gently, pour in the milk, then add the remaining dry ingredients. Mix just until combined—overmixing makes tough cupcakes, and nobody wants that.
- Divide batter evenly and bake:
- Fill each liner about two-thirds full using a spoon or ice cream scoop, then bake for 18 to 20 minutes until a toothpick inserted in the center comes out clean. They should be just set when you pull them out, not overdone.
- Let cupcakes cool completely before frosting:
- This takes patience, but frosting warm cupcakes will melt and slide off, so give them at least an hour at room temperature. I usually bake mine in the morning and frost them after lunch.
- Prepare the buttercream frosting:
- Beat softened butter until smooth, gradually add sifted powdered sugar a little at a time, then add milk, vanilla, and salt. If it seems too thick, add a bit more milk; if it's too soft, add more sugar.
- Frost each cupcake with a swirl:
- Spoon or pipe frosting onto each cooled cupcake, making a little mound in the center where the cap topper will sit. A slight swirl looks more interesting than a flat top.
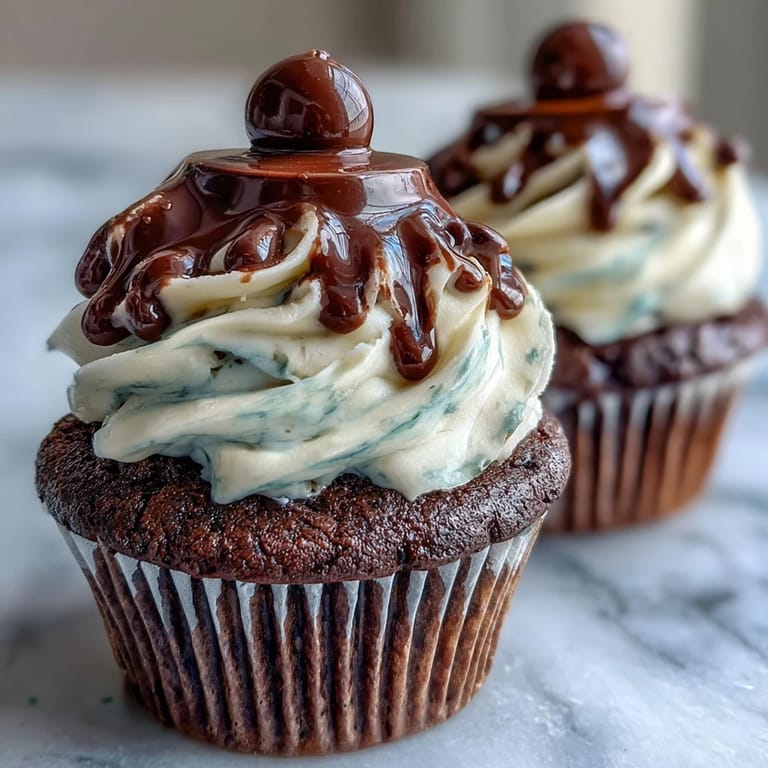
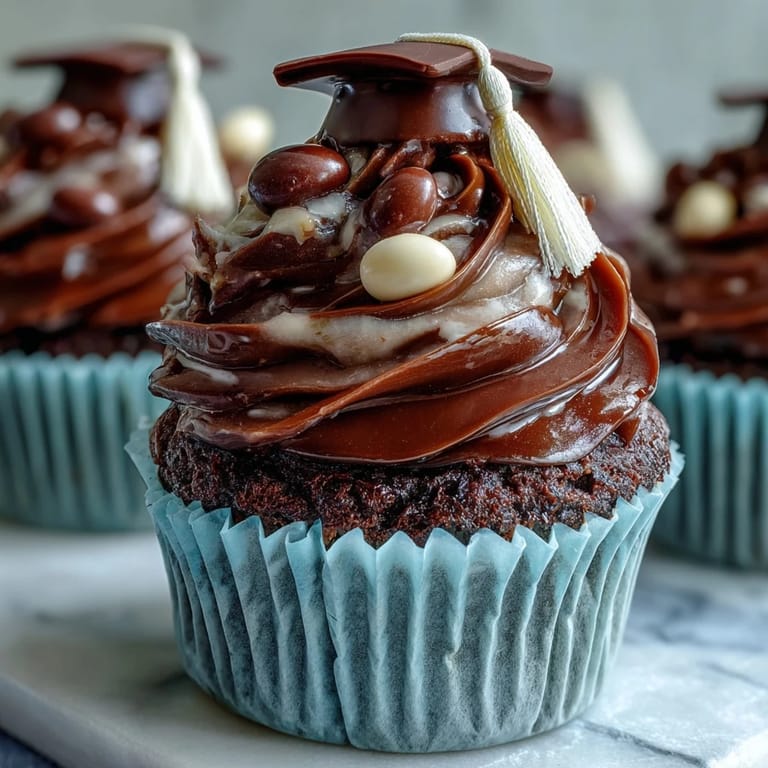
- Assemble the graduation cap toppers:
- Place a chocolate square flat-side up, attach a peanut butter cup upside-down in the center with a tiny dab of melted chocolate or frosting, then add the licorice tassel and a candy button on top. Let them set for a few minutes so everything stays put.
- Crown each cupcake with its cap:
- Place each topper gently on the frosted cupcake and step back to admire your work. You've just made something that looks like it came from a bakery.
 Save
Save At the graduation party, I watched my niece point out the cupcakes to her friends and explain that each cap was edible, and I saw them actually bite into the decorations instead of just picking them off. It hit me then that these weren't just cupcakes—they were a small way of saying this moment matters and we're celebrating you.
Making the Caps Feel Special
The most fun part is realizing you can customize these toppers to match school colors or make them personal. If you want to get fancy, add a tiny dab of food coloring to melted chocolate before assembling, or use colored candy pearls instead of plain M&Ms. The beauty is that once you understand the basic structure—chocolate square, peanut butter cup dome, tassel, button—you can play with it and make it your own.
Storage and Make-Ahead Tips
You can bake the cupcakes up to a day ahead and store them in an airtight container at room temperature, which takes a huge amount of stress off party day. The frosting can be made a few hours in advance and kept covered on the counter. Assemble the cap toppers as close to serving time as possible so they stay crisp and don't absorb moisture from the frosting.
Adapting for Allergies and Preferences
If peanut allergies are a concern in your crowd, swap the peanut butter cups for chocolate squares and you've got an equally delicious cap. Food coloring mixed into the frosting lets you match your graduate's school colors, which always makes people smile when they realize you went that extra step. These small adjustments show you were thinking about everyone, not just making cupcakes.
- Double-check all candy labels for allergen information before assembling, especially if kids will be eating them.
- Store leftover cupcakes in an airtight container for up to two days at room temperature, though they're honestly best fresh.
- If you're making these for a large crowd, assemble the caps in advance and keep them in a cool, dry place until you're ready to place them on frosted cupcakes.
 Save
Save These cupcakes turned into more than just a dessert for that graduation party—they became a memory everyone could taste and share. If you're celebrating someone's achievement, these are worth the effort.
Recipe FAQs
- → What ingredients create the cupcake base?
All-purpose flour, sugar, butter, eggs, milk, baking powder, salt, and vanilla extract combine for a tender, moist texture.
- → How is the buttercream frosting prepared?
Softened butter is whipped smooth, then powdered sugar, milk, vanilla, and a pinch of salt are added gradually until fluffy and spreadable.
- → How are the edible cap toppers assembled?
Chocolate squares serve as the cap base, peanut butter cups are attached upside-down in the center, licorice pieces form tassels, and mini candies create button details.
- → Can these be adapted for nut allergies?
Yes, substitute peanut butter cups with chocolate squares to avoid nuts and ensure safety regarding allergens.
- → What is the recommended baking temperature and time?
Bake at 350°F (175°C) for 18 to 20 minutes or until a toothpick inserted comes out clean.